We have experience removing dense thorny brush on hillsides as well as more friendly brush in level situations. Depending upon the exact situation, we use a handheld brush cutter, a chainsaw, and long-handled pruners. Part of the brush clearing is what to do with the brush after it is cut. In some situations it can be left elsewhere on the property. In others, it must be removed from the property. Another question is what to do with the roots remaining in the soil (in future years they will likely grow shoots and the brush situation will return). If there is just a little brush being cut out, often the roots can be dug up. If there is a lot of brush being cut and digging up all the roots is impractical, there could be another solution to keep it from growing such as bringing in a professional pesticide applicator to apply a product to kill the roots. Further, you may wish to consider some sort of cover to be planted which will resist other unwanted woody plants and weeds from growing on the now bare ground in the future. On the other hand, if just a short-term brush solution is required, then dealing with the cut stems and roots and even establishing a desirable vegetative cover may not be a concern. These are all the questions we can discuss with you prior to tackling this.
We use a chainsaw and a pole pruner (basically a pole with a small chainsaw on the end) to tackle tree jobs. We can cut down small trees, cut lower limbs off trees (up to about 10-12’ up), cut down larger trees if they can fall safely without risk of injuring people or damaging property, or cut up already felled trees, such as living or dead trees that have fallen over in a storm. Where a large tree needs to come down that’s in a yard where, if the tree were felled in one piece, damage would or could occur to nearby structures (with people possibly being hurt as well), a professional tree service will need to be called in to take down these trees in sections. However, we can still help. Much of the cost of tree removal is related to dealing with the tree once it is on the ground – cutting it up and removing it. If you instruct the professional tree service to just get the large pieces onto the ground as efficiently as possible (and they will do it safely as well), and they are willing to only do that part of the job, then they will charge significantly less than what they would have for a complete removal. We can cut up the tree and do with the remains as you instruct for an economical price. Whether it’s small trees, limbs, or large trees on the ground, you may wish some of the wood left for burning or all of it hauled away (this may also partially depend on the species of tree). These are all things we can discuss with you when you are considering having us do the job for you.
We are equipped to take down small outdoor structures, and have taken down wood frame sheds, decks, and small retaining walls. On the inside we have done demolitions in preparation for renovations. In some cases we have gutted already finished but highly dated basements to make way for a new basement apartment to be built. In other cases all that was required was wallpaper removal or wood panelling removal in preparation for painting the wall that was underneath. Tools we use include a reciprocating saw, various prybars and a sledgehammer. If part of the house is still occupied, then we will pay extra special attention to keeping the work environment clean and preventing dust, etc from spreading. Note: for larger demolition projects, we will need a spot to place a waste bin.
Pruning generally refers to the removal of smaller branches and even twigs for one of several reasons- removal of deadwood and diseased branches, removal of branches that are hanging down too low, giving better shape to bushes and small trees, and simply trimming back wild new growth on shrubs and hedges to give them flat surfaces and straight lines. We can deal with heights up to about 10 to 12 feet. Equipment that can be used include a chainsaw, a pole pruner, an extension trimmer, a hedge clipper, and long and short handled pruners.
Although lawns can be seeded, using sod is generally the better way to go. While freshly laid sod needs to be watered once or twice a day, grass seed, especially once it starts to sprout, must be watered two to three times a day (four times during hot sunny weather). It doesn’t take much drying out to kill new grass seedlings. Freshly laid sod watering needs aren’t as demanding and you will have an instant lawn with less opportunity for weed seeds to land, germinate and take root. The first step in sodding is to prepare the ground. Things to consider are- making sure the ground is graded so that rain and melt water flows where it’s supposed to go including AWAY from your home’s foundation, getting the ground smooth without any less dense spots that will sink after the sod is laid, and making sure the ground is about 2/3 of an inch below any hard surfaces like pavement, patio tiles and concrete walkways (this is so that the sod surface won’t be above these hard surfaces blocking water drainage from the hard surfaces or, conversely, so the sod surface won’t be too far below causing tripping and mowing hazards). The next step is to have the sod delivered no more than a couple hours before sod laying begins so that it is still fresh and hasn’t begun to deteriorate. The third step is laying the sod. It must be laid so that one piece butts up tightly against the next. The fourth step is giving it a thorough watering after it is laid and instructing the homeowner in the frequencies with which it is to be watered. A rake is mostly used to prepare the ground but, where a lot of dirt needs to be shifted, a wheelbarrow and shovel may be used as well. Laying the sod usually just requires a sharp spade shovel to cut end pieces and pieces that fit around objects.
However, there are situations in which seeding is better. Two examples are 1) overseeding an existing lawn to help rehabilitate it 2) where there’s a large less important area that needs good grass coverage to prevent weeds and hold the soil in place but where its size doesn’t justify the cost of sod.
Yes, we do the traditional grass cutting with a lawn mower. However, we also specialize in cutting down TALL out-of-control grass with a specialized piece of equipment. There is no limit to how tall the grass can be. We have cut down grass that has been almost 4 feet tall, but we can go much higher than this. For regular mowing, the two most important things are a sharp blade and the right height setting which, in most cases, is about 3 or 3.5 inches. A sharp blade prevents tearing of the grass blades and thus disease entry, and the proper height setting works to reduce weeds while keeping your lawn looking neat and providing enough grass blade surface area for sufficient photosynthesis to take place for grass health. We ensure that our mower has a sharp cutting blade and is set to the correct height. Having said this, it is a good idea for a last cutting in early November to take place before most of the leaves have fallen where the setting is a little lower. This will both help with leaf cleanups later in November as well as make it easier for new grass growth in the spring.
We can work with you to design and plant these beds. For perennial non-woody plants, we consult with someone who has experience working with perennials. Things to consider are visual appeal, climate, exact location in terms of winter salt exposure, whether or not to use a weed-suppressing moisture-retaining material such as a landscape cloth or plastic sheeting, the type of mulch, if any, to use on the surface and the type of edging the beds will have (sloped edge going below sharply cut edge of lawn, a plastic border, a retaining wall and the material to use, etc).
We can work with you on deciding all this and then implement it. However, you may have an existing bed that is somewhat out-of-control and needs some TLC in terms of WEEDING, edging, and perhaps some pruning, trimming and shaping of the shrubs in it. We can help with all of it and specialize in cases where weeds have largely taken over.
We can do leaf cleanups for you, whether they are mid fall cleanups that get the bulk of the leaves that have already fallen, or thorough end-of-the-season cleanups that get almost every last leaf, or early spring clean-ups that get the leaves that were missed or never cleaned up in the fall. The most economical method of disposal is to put the leaves in yard waste bags and let the Region haul them away. If we do this method, we will put the bags in a convenient spot and then return the night before the yard waste pickup and put them out at the road. However, for an extra cost, there is the option of us hauling them away as well.
Whether the location is inside a house, inside another building on the property like a garage or shed, or just in the open yard, and whether the property is where you live, a place you’ve just purchased, or a rental location between tenants, we can deal with unwanted “stuff”. This “stuff” could be litter, old discarded items from decades past, furniture, dishes, old memorabilia that meant something to someone at one time but nothing to anyone now, etc – it doesn’t matter. Whatever you want gone, we will go through and responsibly sort it. If there are things that can have a new life and purpose, we will seek them out. If there isn’t but they are made of metal, glass or most types of plastic, they will be recycled. If it’s deemed household hazardous waste, that will be brought to the appropriate location. What’s left, which we try to minimize, will go to the landfill.
Sometimes there are yards that are just a mess. Maybe the grass is long, there’s junk in it, the flower/shrub beds are full of weeds, the shrubs and bushes are overgrown, several saplings have sprung up where they aren’t supposed to and there’s a falling down shed in the back corner. A general yard cleanup combines several of the previously described services into one overall cleanup.
We can paint the OUTSIDE of houses on surfaces that take paint, or other structures where wood or metal needs to be painted, and can paint INSIDE ceilings, walls and trim. Before painting we will work with you to decide upon a colour, type of paint (typically latex but there are others for different purposes), and sheen of paint (such as flat, eggshell, semi-gloss, etc). Then we will prepare the area using some combination of drop cloths, plastic and painter’s tape; scrape off any loose paint; fill and sand any holes; prime if the surface is bare, the colour is changing significantly or the type of paint is changing; and then paint with precision.
Currently we are equipped with a snowblower, shovels and an ice scraper and can clear sidewalks, driveways and very small parking lots (3 – 4 cars). After clearing, we usually will apply either salt or ice melter. We can do pay-as-you-go or set you up with a season package.
This is not a normal homeowner concern but only becomes a concern when the hydro amperage is being raised, the cables running to the house only have the lower capacity and these cables are buried underground. (Note: the utility cables which supply all the homes in the neighbourhood are usually at a much higher amperage, such as 500 amps.) For example, if the house is on 100 amp service, the cable running to the house from the utility supply is also 100 amps, the owner is needing 200 amp service (the house being converted to a duplex might be one reason why), then the electrical panel, the hydro meter and the cables to the house all would need to be replaced to handle the 200 amp capacity. If the cables are overhead, such as in older neighbourhoods, it is obvious where they are and usually the utility company will simply do a replacement. On the other hand, if the cables are buried underground, the person in charge of the renovation or change is responsible to have the cables replaced (they will need to hire a licenced electrician to do the actual replacement). However, they must first determine exactly where the cables from the house join with the main utility cables. “Where” not only means the horizontal coordinates, but also the depth.
A utility locate will determine the expected location and possible depth, but this needs to be confirmed or modified by actual exposure of the connection. As live wires are being searched for, no powered equipment such as small backhoes or power augers can be used – the locate hole must be hand dug.* Digging takes place at the expected location but later may shift to one side of the original hole or another depending on if cables are found and where they are found. Care must be exercised as the depth could be anywhere from 3 feet to 7 feet down and the cables are unlikely to be in any sort of protective conduit. Once the connection point is believed to have been found then a hydro inspector needs to confirm that it is indeed the connection. A trench then needs to be dug from where the electrical comes to the house to the hole which has the connection exposed. If the trench is away from where the old cable is, power equipment can be used to dig it. However, if the plan is to lay the new cable in the same location as the old cable or near to it, then powered equipment cannot be used to dig this trench but it must be hand dug as well. Hydro inspections will be needed at several more points in the process.
* A newer technology, called hydro excavating (in this case “hydro” refers to water not electricity), uses high powered jets of water to excavate earth, and can do so to locate utilities. However, the cost of this may be prohibitive for small-scale residential use.
Do you have an old worn hardwood floor that you’d like to see brought nearly back to its original state? Perhaps the finish has worn through, there is some water damage, there are staples in it, and maybe someone thought it would be a great idea to paint it gloss black (true story). We can get the old worn finish (and paint!) sanded off and most or all of the water damage and any deep paint permeation sanded away, and the floor brought back to life with new coats of polyurethane. The process involves doing a coarse sanding with a drum sander and an edge sander until all the issues are sanded away, doing medium and fine sandings to achieve smoothness, doing a mineral spirits treatment, applying wood sealer, giving the sealer a light sanding, then carefully applying two or three coats of polyurethane. Note: we have a vacuum cleaner hooked up to both the drum and edging sanders when they are in operation in order to minimize dust. If necessary (such as if another part of the home is occupied), we will also put up plastic sheeting to prevent any escaping dust from travelling to where it’s not supposed to go.
Sometimes there can be really gross messes, such as if you’ve just purchased a house from someone who was really messy and dirty, or renters who were definitely not Martha Stewart have left and you need to get an apartment ready for new renters. In these situations, we can come in and do a thorough clean. If the place is already furnished, we will subcontract to a professional carpet and upholstery cleaner for furniture like couches and armchairs and for carpets. In many situations we will recommend mattresses be replaced. Included in this category is the thorough cleaning of appliances such as refrigerators.
If there are “handyman” repairs you’d like done, please ask to see if we can do them. We may be able to. If not, we will usually be able to recommend someone who can. Here is a list of some of the miscellaneous repairs and tasks we have already done-
– replaced hinges on cupboard doors
– replaced dishwasher
– installed a small cupboard on a wall
– designed and fitted a flat counter-like surface to rest on a set of front load laundry machines
– labelled a breaker panel after determining which breakers are for which circuits
– hooked up laundry machines including water hoses and vents
– recorded narrated video walkthroughs of apartments and houses and took room measurements (once travelling 2.5 hrs to get to location)
– changed door knobs
– changed locks
– replaced step boards on an outside stairway
– caulked
– hung curtain rods
– installed shower rods
– installed mount for wall TV, installed TV and set up
– removed graffiti
– dug out a hole for a new window well
– re-laid patio stones
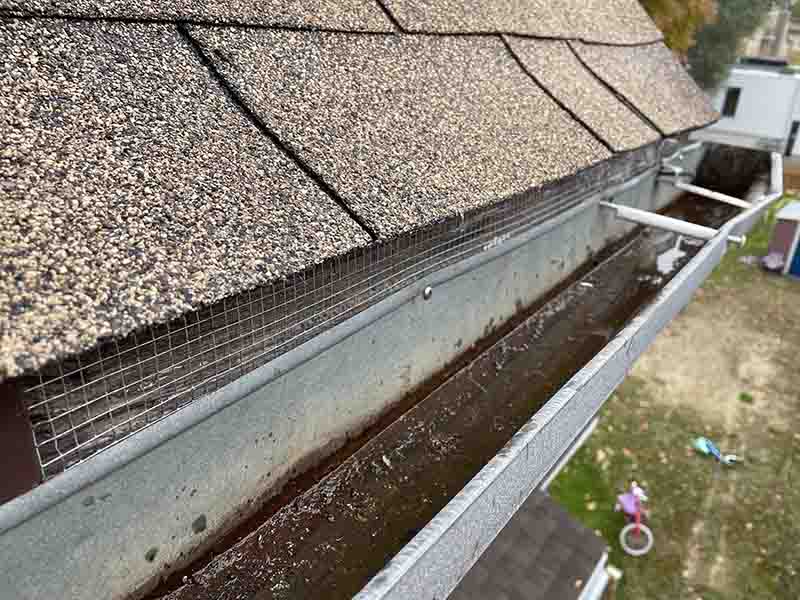
– covered up squirrel holes between eve troughs and shingles with wire mesh
– moved furniture and appliances
– hung pictures
– adjusted door strike plate
– put pool cover on
– cut asphalt and concrete using quick cut saw
– installed outside stair treads